Protein Preparation
1. Overview of Protein Preparation
Protein preparation is an important link in computer-aided drug design. It involves the preparation and optimization of protein models for subsequent analysis and simulation. To facilitate users to better use the protein-related functions in DrugFlow, we provide an interactive feature for editing protein structures and their preprocessing. Protein preparation features include: 1. Removing irrelevant components (such as water molecules, ions, etc.) and components that may interfere with subsequent analysis from the protein structure; 2. Completing missing atoms or residues; 3. Correcting erroneous residue structures; 4. Adjusting the protonation state and optimizing the hydrogen network; 5. Minimizing energy optimization of the protein, etc.
In general, Protein preparation provides an accurate and reliable protein model for subsequent steps in drug design (such as docking, molecular dynamics simulations, etc.), which helps to improve the quality and accuracy of drug design.
2. Instruction for Use
The calculation page of protein preparation is divided into two areas, the left is the protein visualization area, the right is to set calculation parameters, and the whole protein preparation is divided into four steps: keep structure- structure issuses- missing residues- Refinement. There are some parameters for you to choose in each step.
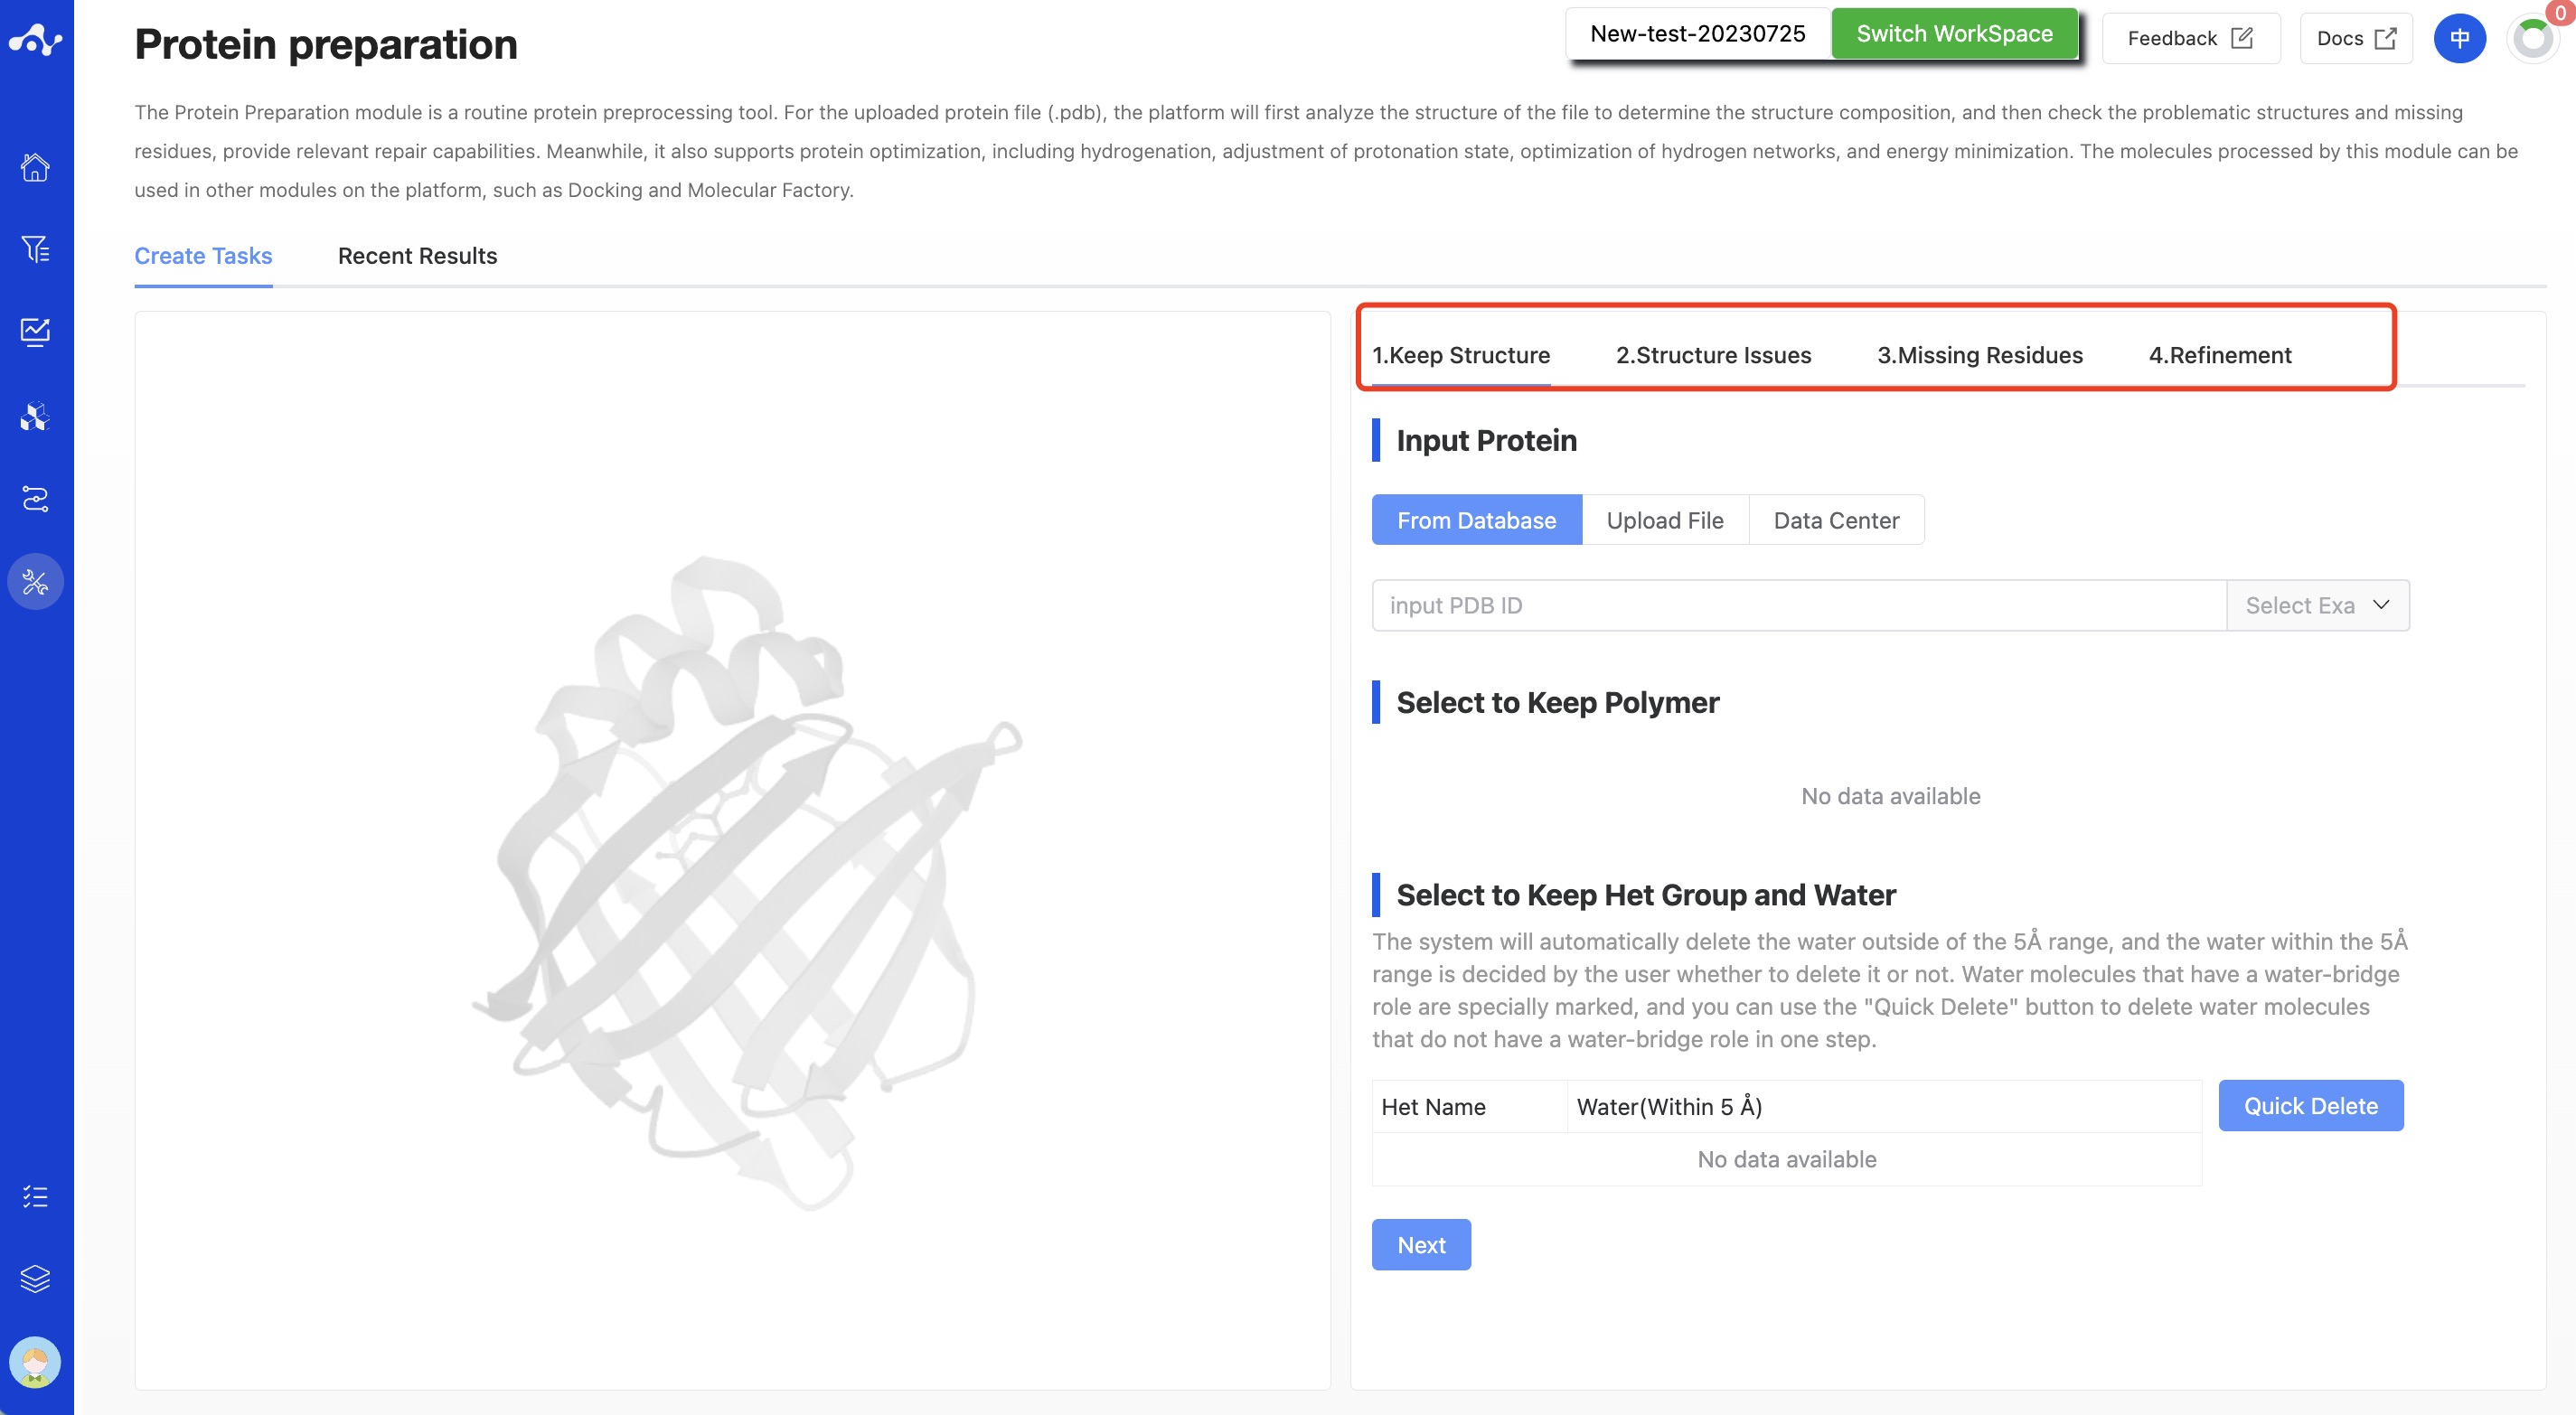
Figure 1. Calculation page for protein preparation - Blank
(1) Keep Structure
The main input in this step is the protein file and the components to be retained. The components here include three parts: protein chains, small molecules (including small peptides, small molecules, and ions), and water molecules.
- Input Protein
The platform offers users three ways to upload protein files: importing from a database, uploading files and selecting data from data center.
Import from the RCSB PDB database. If the "Database Import" checkbox is checked, when users know the Protein Data Bank (PDB) ID of the protein, they can directly input the 4-digit PDB ID into the text box, and the protein structure will be displayed in the 3D display area on the left.
Upload File. If the "Upload File" checkbox is checked, users can select a local file by clicking the button below. After the file is selected, the file name will be displayed on the button, and the file content will be displayed on the right. The uploaded file only supports .pdb format.
Data Center. If the "Data Center" checkbox is checked, users can select data from the data center by clicking the button below to open a pop-up window and clicking on the file name. After clicking, the pop-up window disappears and the task can be submitted.
- Select to keep polymer
The system defaults to show all chain information in the uploaded .pdb file, with all chains being selected. When a certain chain is deselected, that chain will not be visible in the protein visualization area.
- Select to keep het group and water
This defaults to showing all small molecules and their water molecules within a 5Å range in the pdb file. The system will default to deleting water outside the 5Å range, while water within the 5Å range is up to the user to decide whether to delete. Water molecules that have a water bridge effect have a special mark; you can use the [Quick Delete] button to delete the water that do not have a water bridge effect in one step.
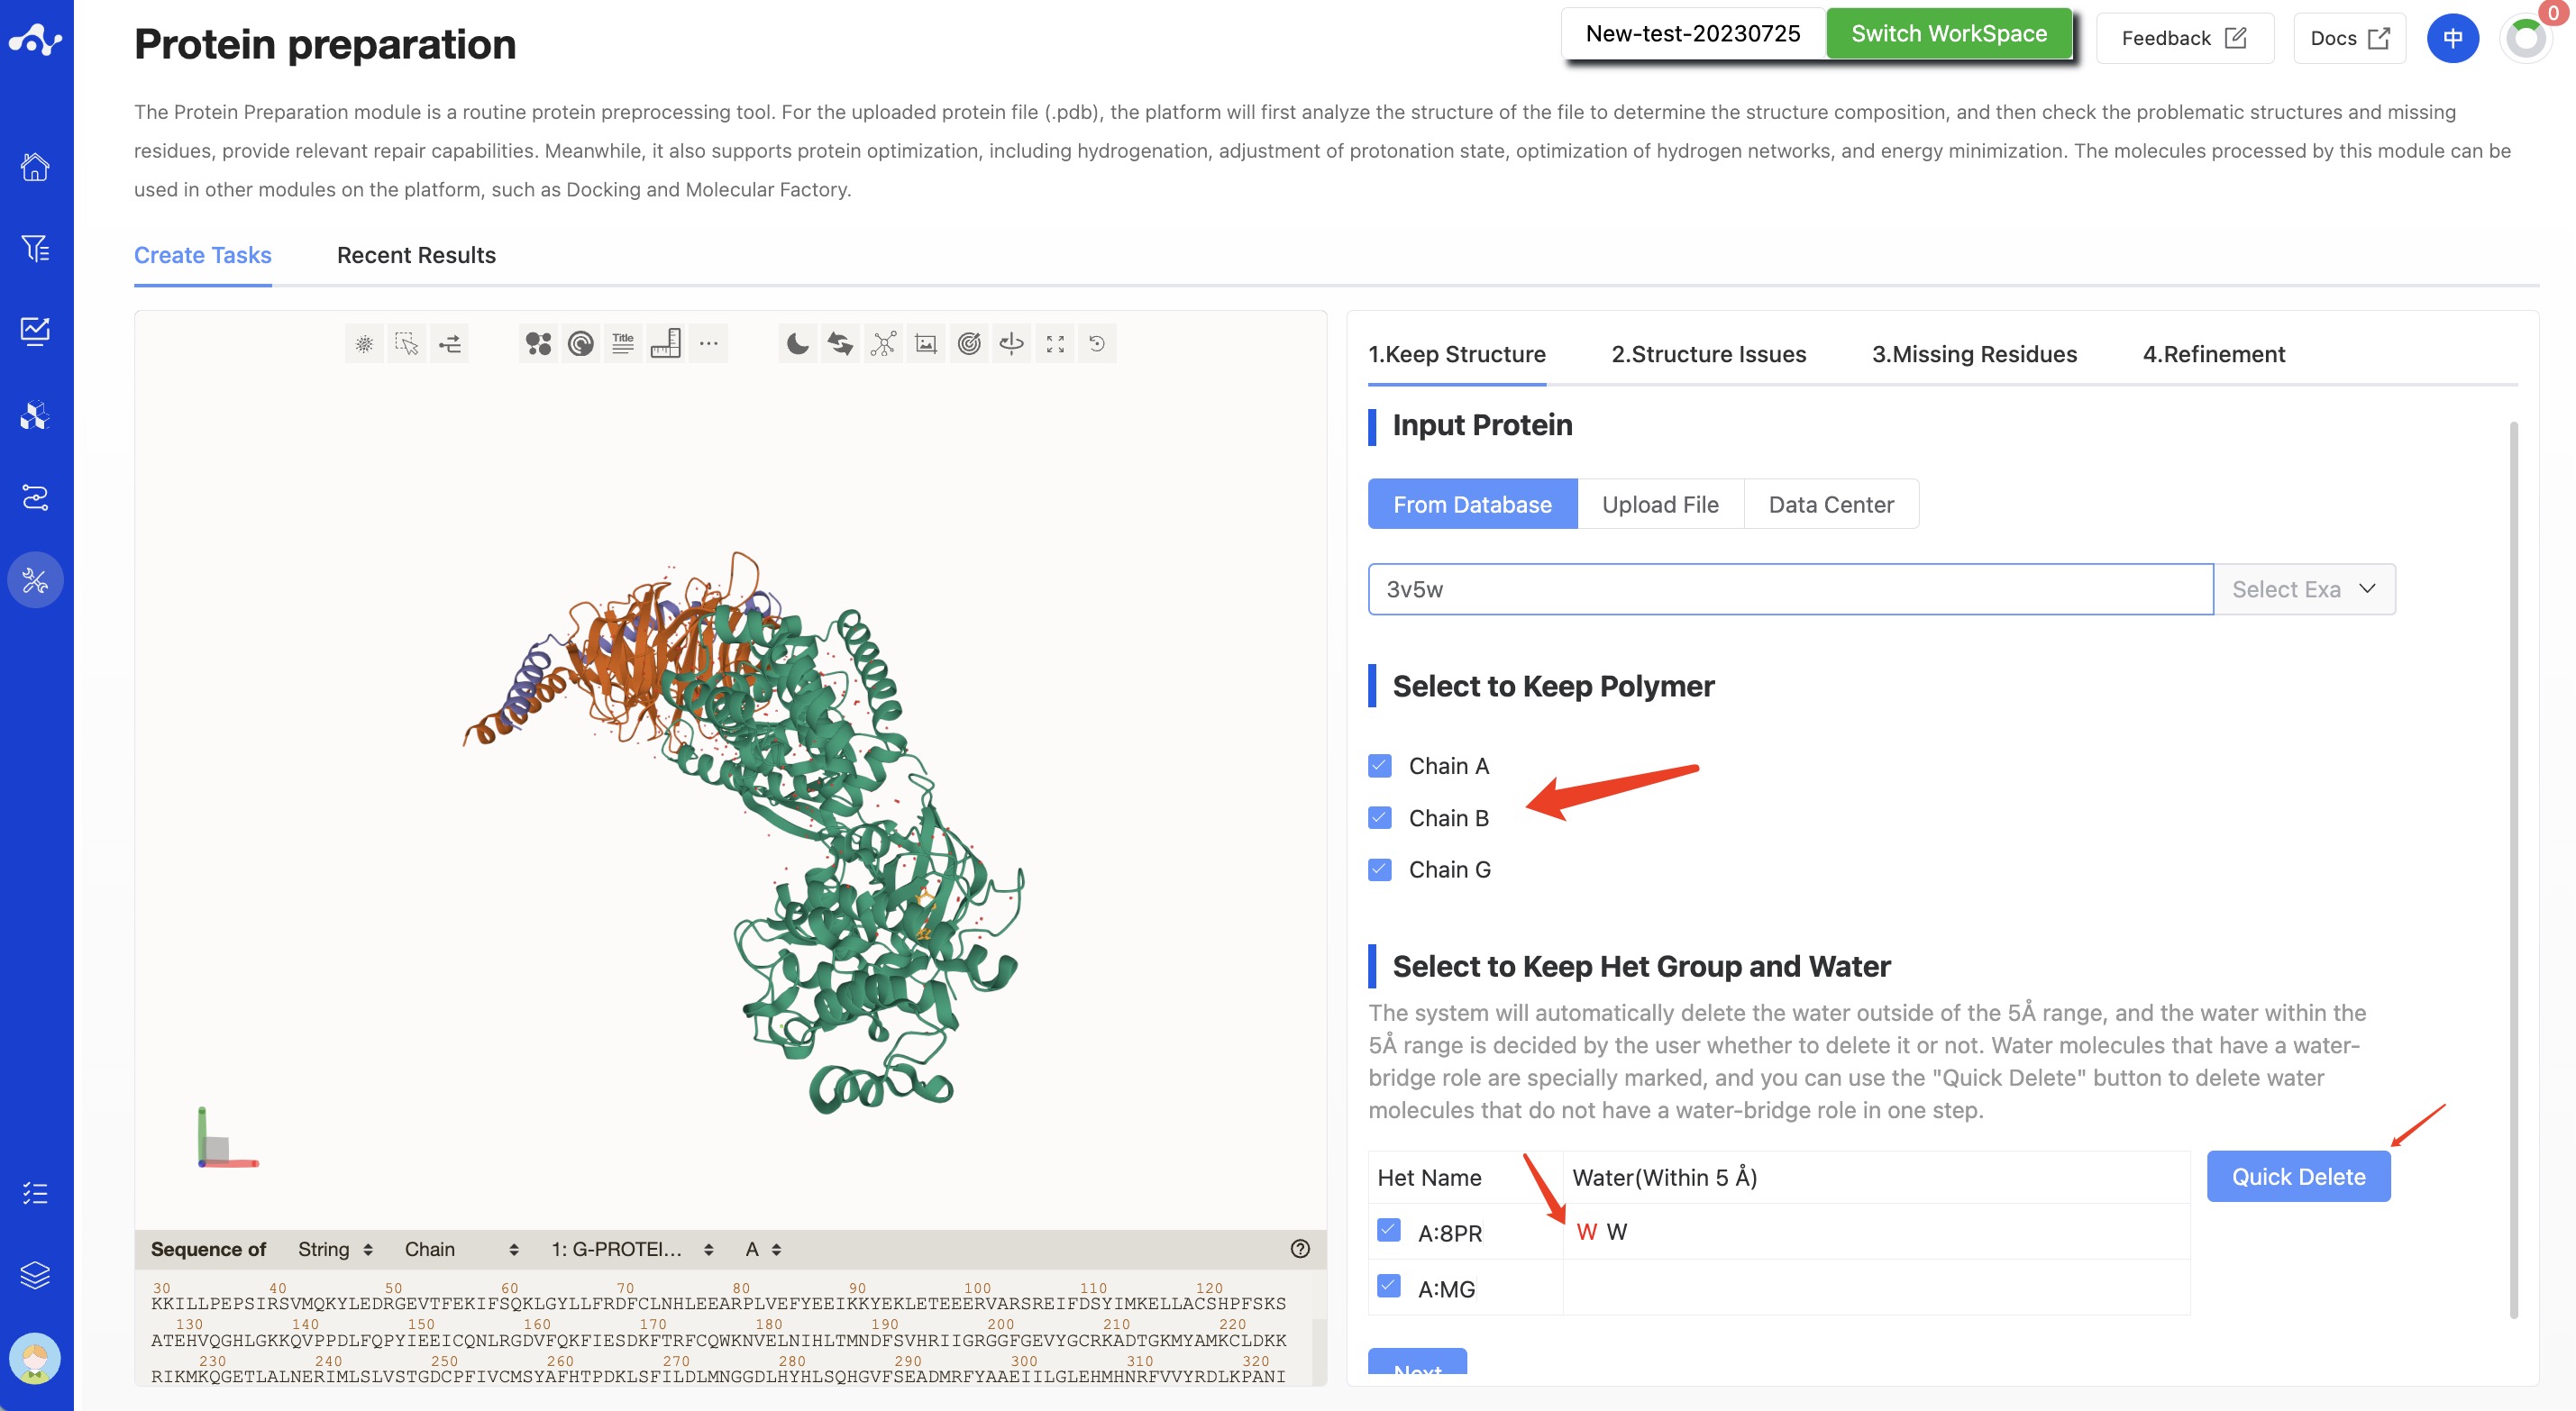
Figure 2. Calculation page for protein preparation - Keep Structure
(2) Structure Issuses
This step is mainly used to check and repair erroneous residue information. Each error residue is given a specific error type and error details. This content is displayed in the form of a table, each line is clickable, and when this line is clicked, the visualization area on the left will quickly focus on it.
The system defaults to select all problematic items. You can also deselect them. When correcting the structure in this state, the unchecked error structure will not be corrected. Among the selected items, items that can be corrected will no longer be displayed in the table, while items that cannot be fixed will still be retained on the page. Users can manually modify the errors.
Click the [Correct] button, the button will display the "running" interaction until the running is over, the interaction disappears, and the protein visualization area on the right will display the corrected protein. Only after clicking [Correct] can you click [Next Step].
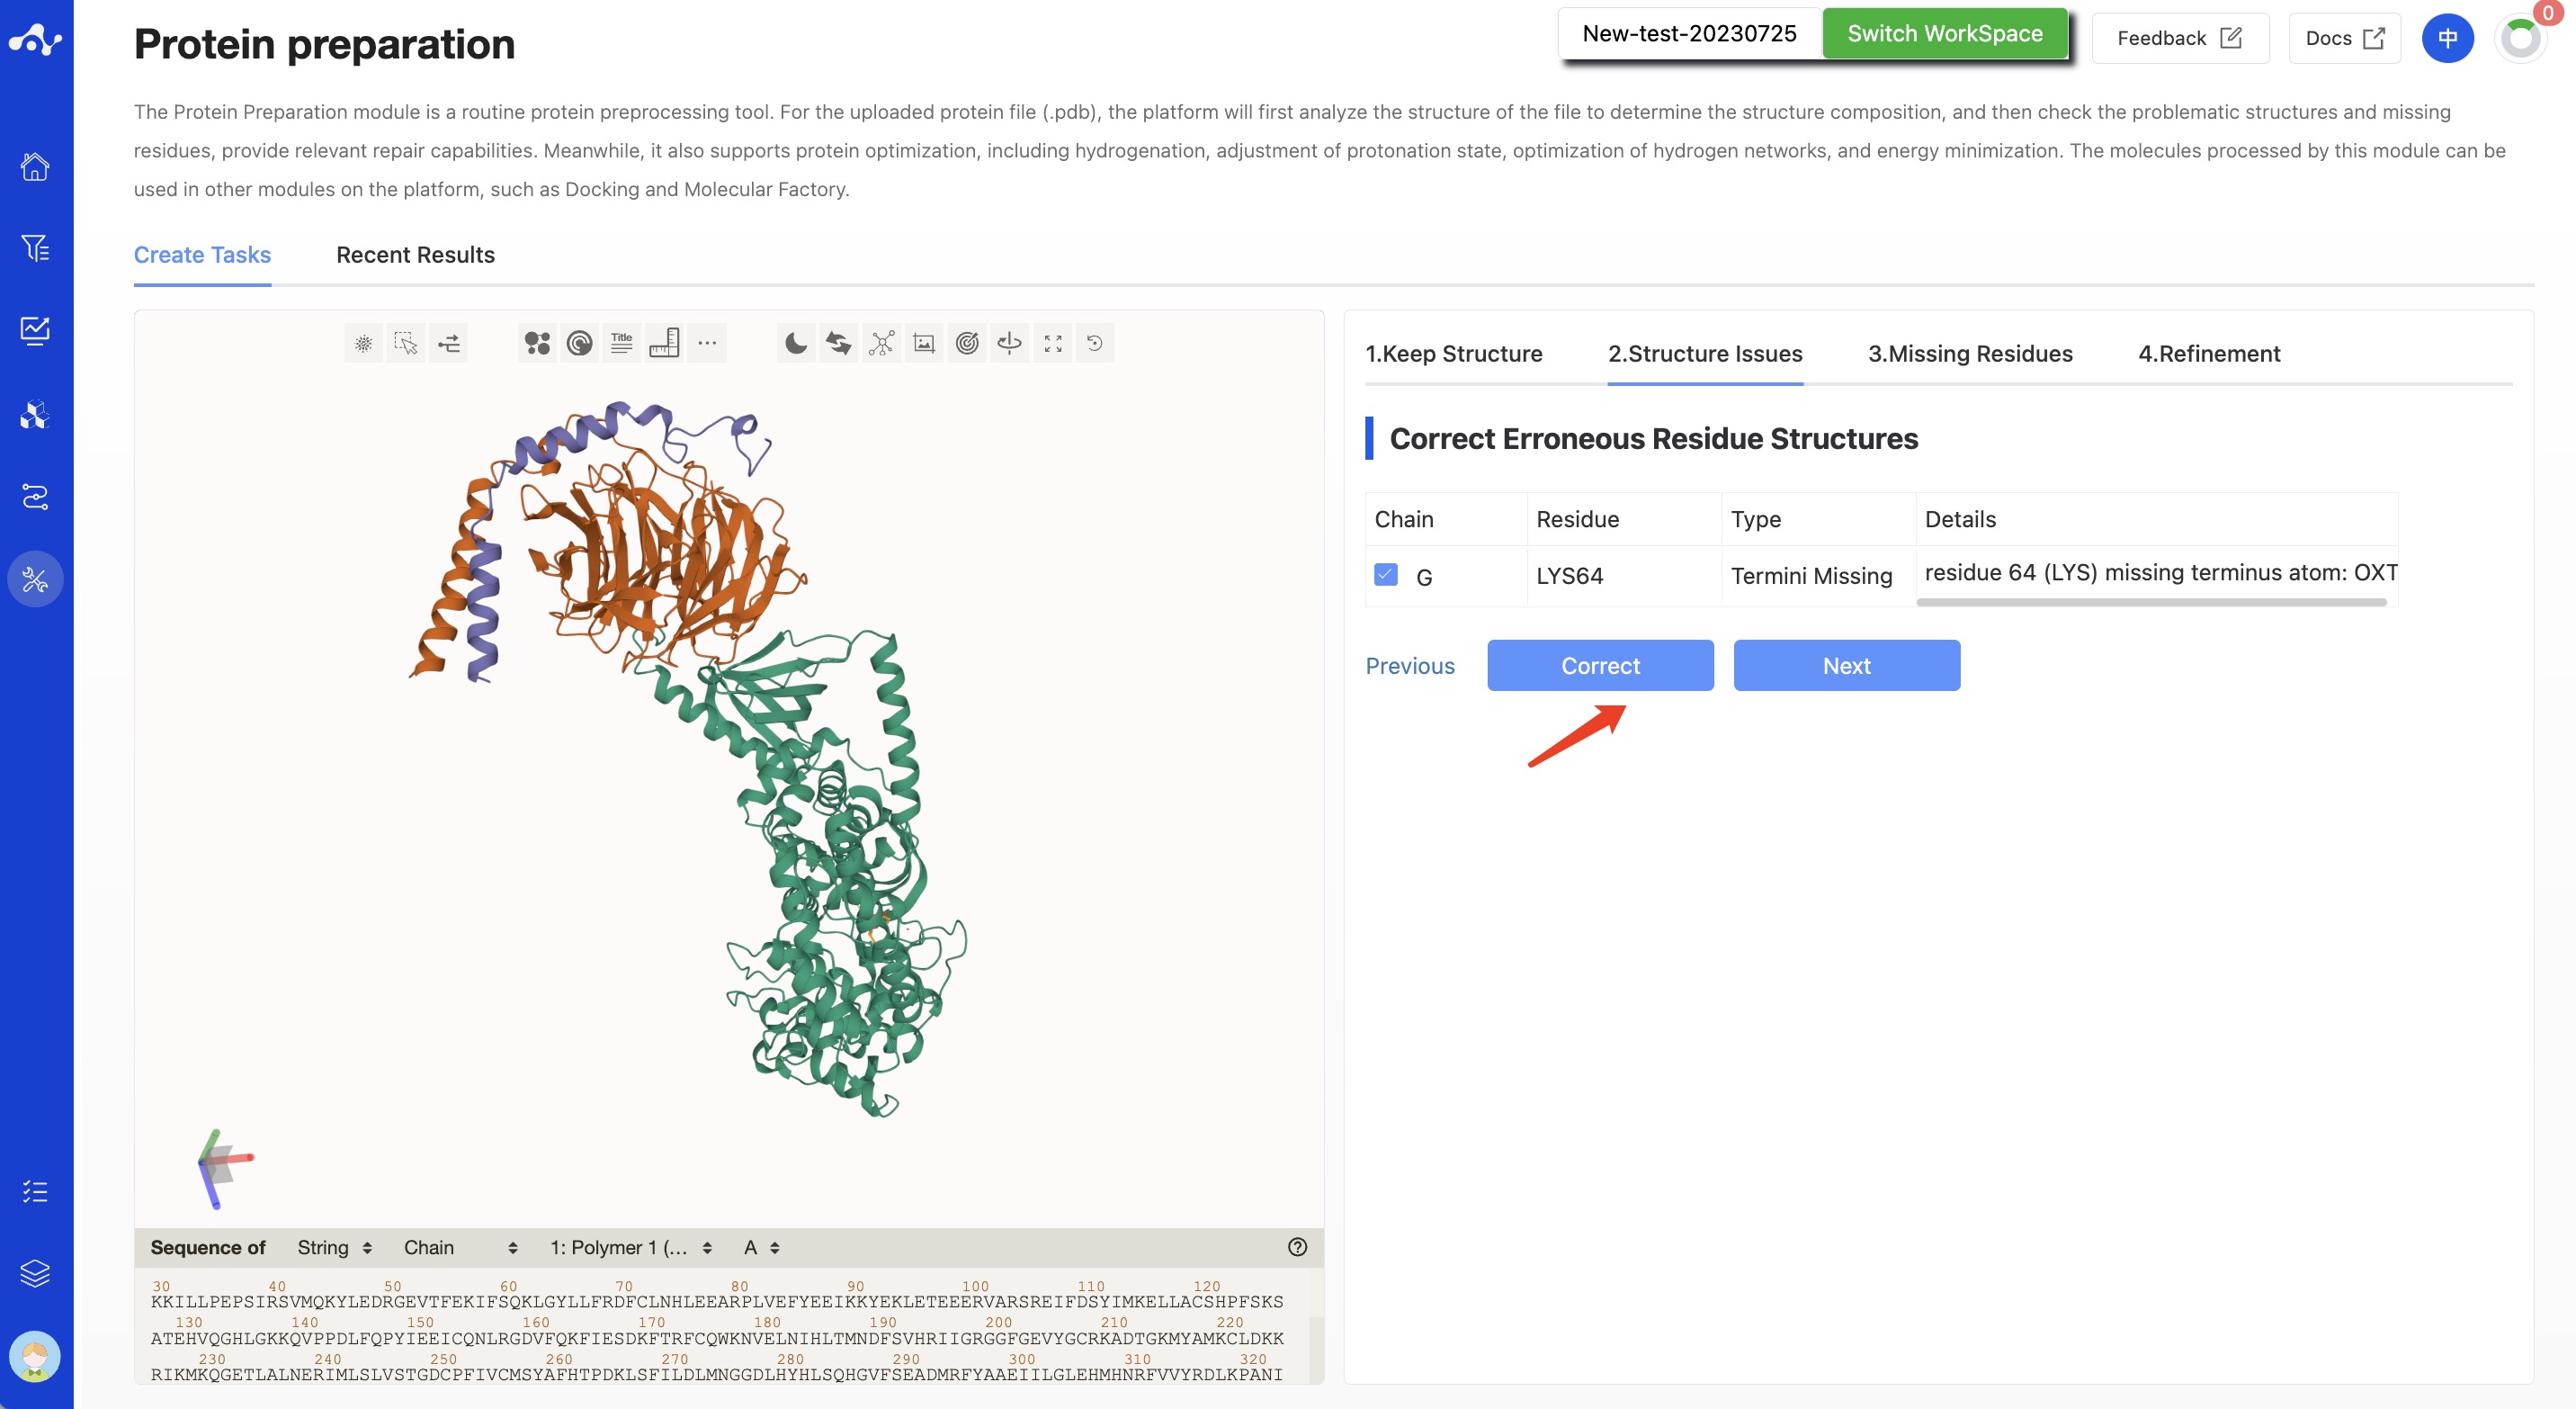
Figure 3. Calculation page for protein preparation - Structure Issuses
(3) Missing Residues
This step is used to check and repair the missing residue sequence in the pdb file sequence. This content is displayed in the form of a table, each line is clickable, and when this line is clicked, the visualization area on the left will quickly focus on it.
The system defaults to select all the missing fragments. You can also deselect them. When correcting the structure in this state, the unchecked residue sequence will not be corrected. Among the selected items, items that can be corrected will no longer be displayed in the table, while items that cannot be fixed will still be retained on the page. Users can manually modify the errors.
Click the [Correct] button, the button will display the "running" interaction until the running is over, the interaction disappears, and the protein visualization area on the right will display the corrected protein. You can also skip the repair of missing residues and directly click [Next Step].
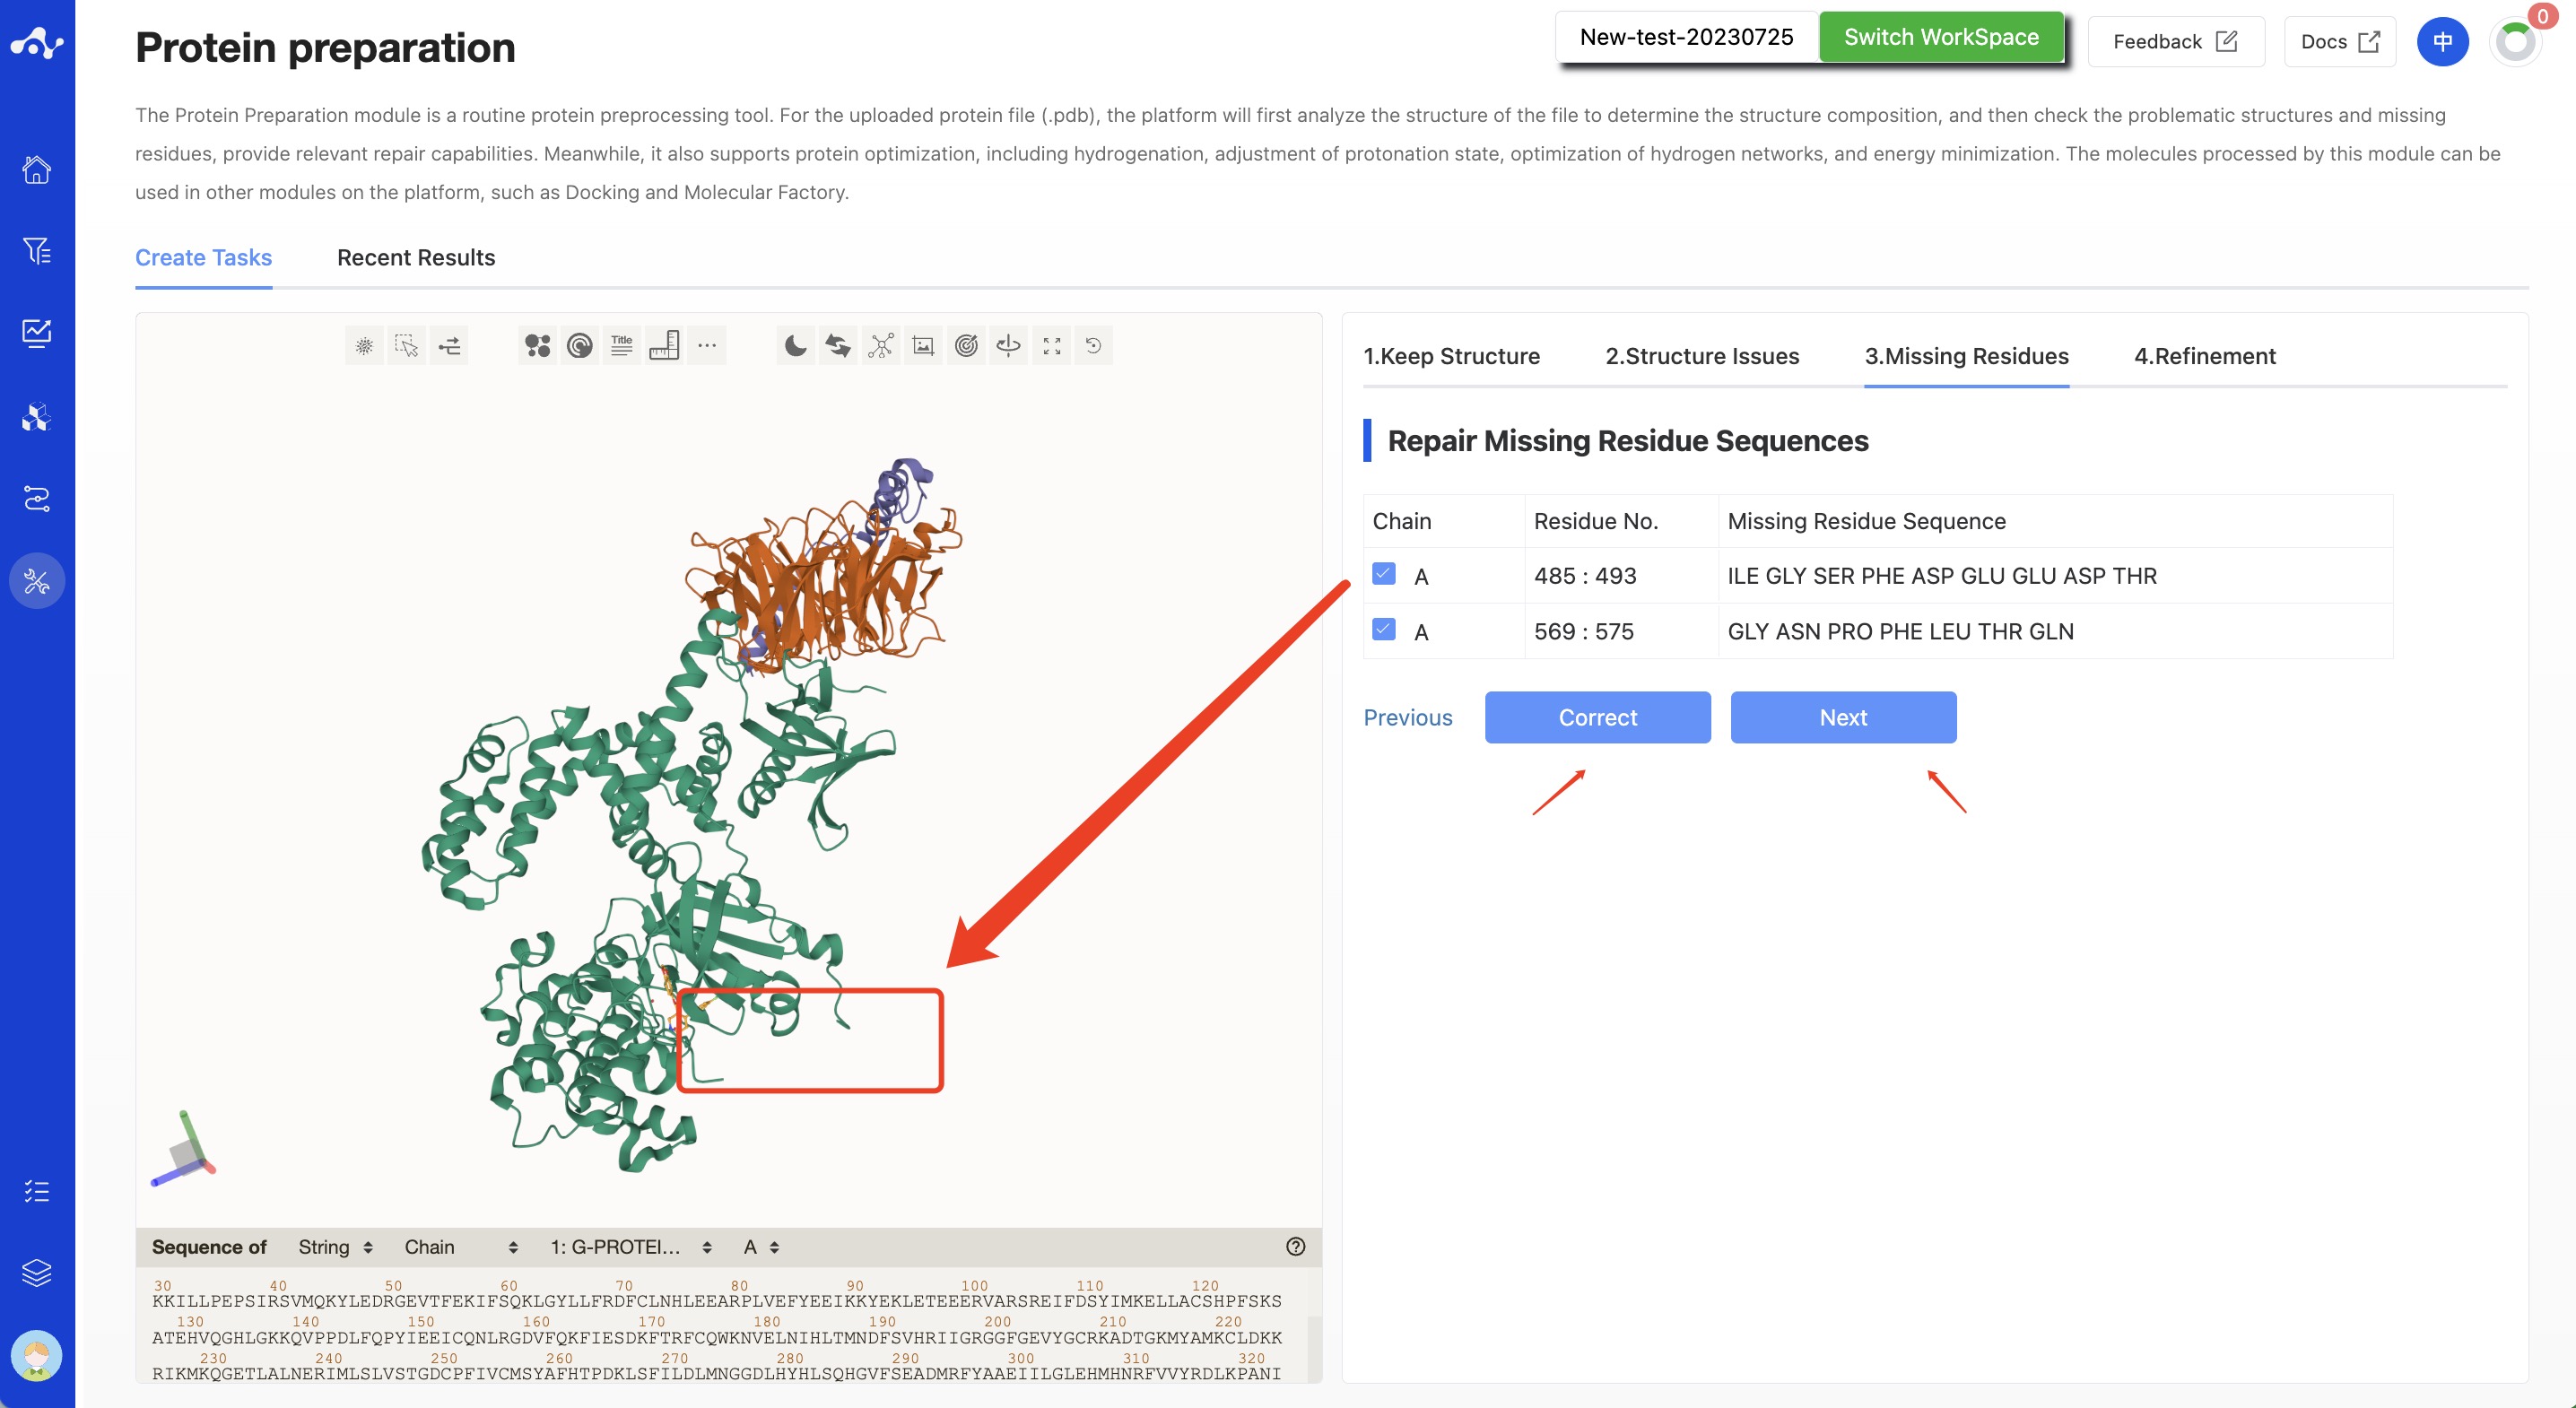
Figure 4. Calculation page for protein preparation - Missing residues
(4) Refinement
- Disulfide bonds
The system provides the function of disulfide bonds. Here will display all possible disulfide bond pairs in the protein, by default, select disulfide bonds in the range of 1.5~3Å, which can be adjusted based on your research purposes. The selected disulfide bond pairs will be retained during protein preprocessing. This operation has a significant impact on protein conformation, so please choose carefully. If you don't need this feature, you can also turn it off directly.
- Protein optimization
Add hydrogen to the protein: Mandatory;
Adjust protonation state: Optional, selected by default, with a pH of 7.4;
Optimize hydrogen network: Optional, selected by default;
Energy minimization: Optional, selected by default, and the chosen force field is AMBER ff14SB.
AMBER ff14SB (recommended). ff14SB is a protein force field parameter set in the AMBER software package, used to describe atomic interactions within biological molecules. It is a particularly applicable force field parameter set for protein systems in the AMBER14 software package, including additional parameters describing interactions between amino acid side chains and important residues in protein folding. AMBER ff14SB has high accuracy and reliability in describing the conformational and dynamical properties of proteins.
AMBER ff15ipq. ff15ipq is an improved protein force field parameter set in the AMBER14 software package, with higher accuracy and reliability compared to AMBER ff14ipq. AMBER ff15ipq includes more polarizable effects and hydrogen bond parameters, allowing for more accurate description of the electronic structure of proteins.
AMBER96. AMBER96 is an early version of the AMBER software package, which has been developed and optimized over many years and now has updated versions such as AMBER14 and AMBER18. However, AMBER96 is still widely used in the field of biomolecular simulation, especially for early research and some classic simulations.
AMBER99SB. AMBER99SB is an improved version of the AMBER99 force field, including additional parameters describing interactions between amino acid side chains and important residues in protein folding. AMBER has high accuracy and reliability in describing the conformational and dynamical properties of proteins.
CHARMM36. CHARMM36 has high accuracy and reliability in describing the conformational and dynamical properties of proteins. It is widely used in the study of protein-protein and protein-ligand interactions, and is one of the commonly used force field parameter sets in the field of biomolecular simulation.
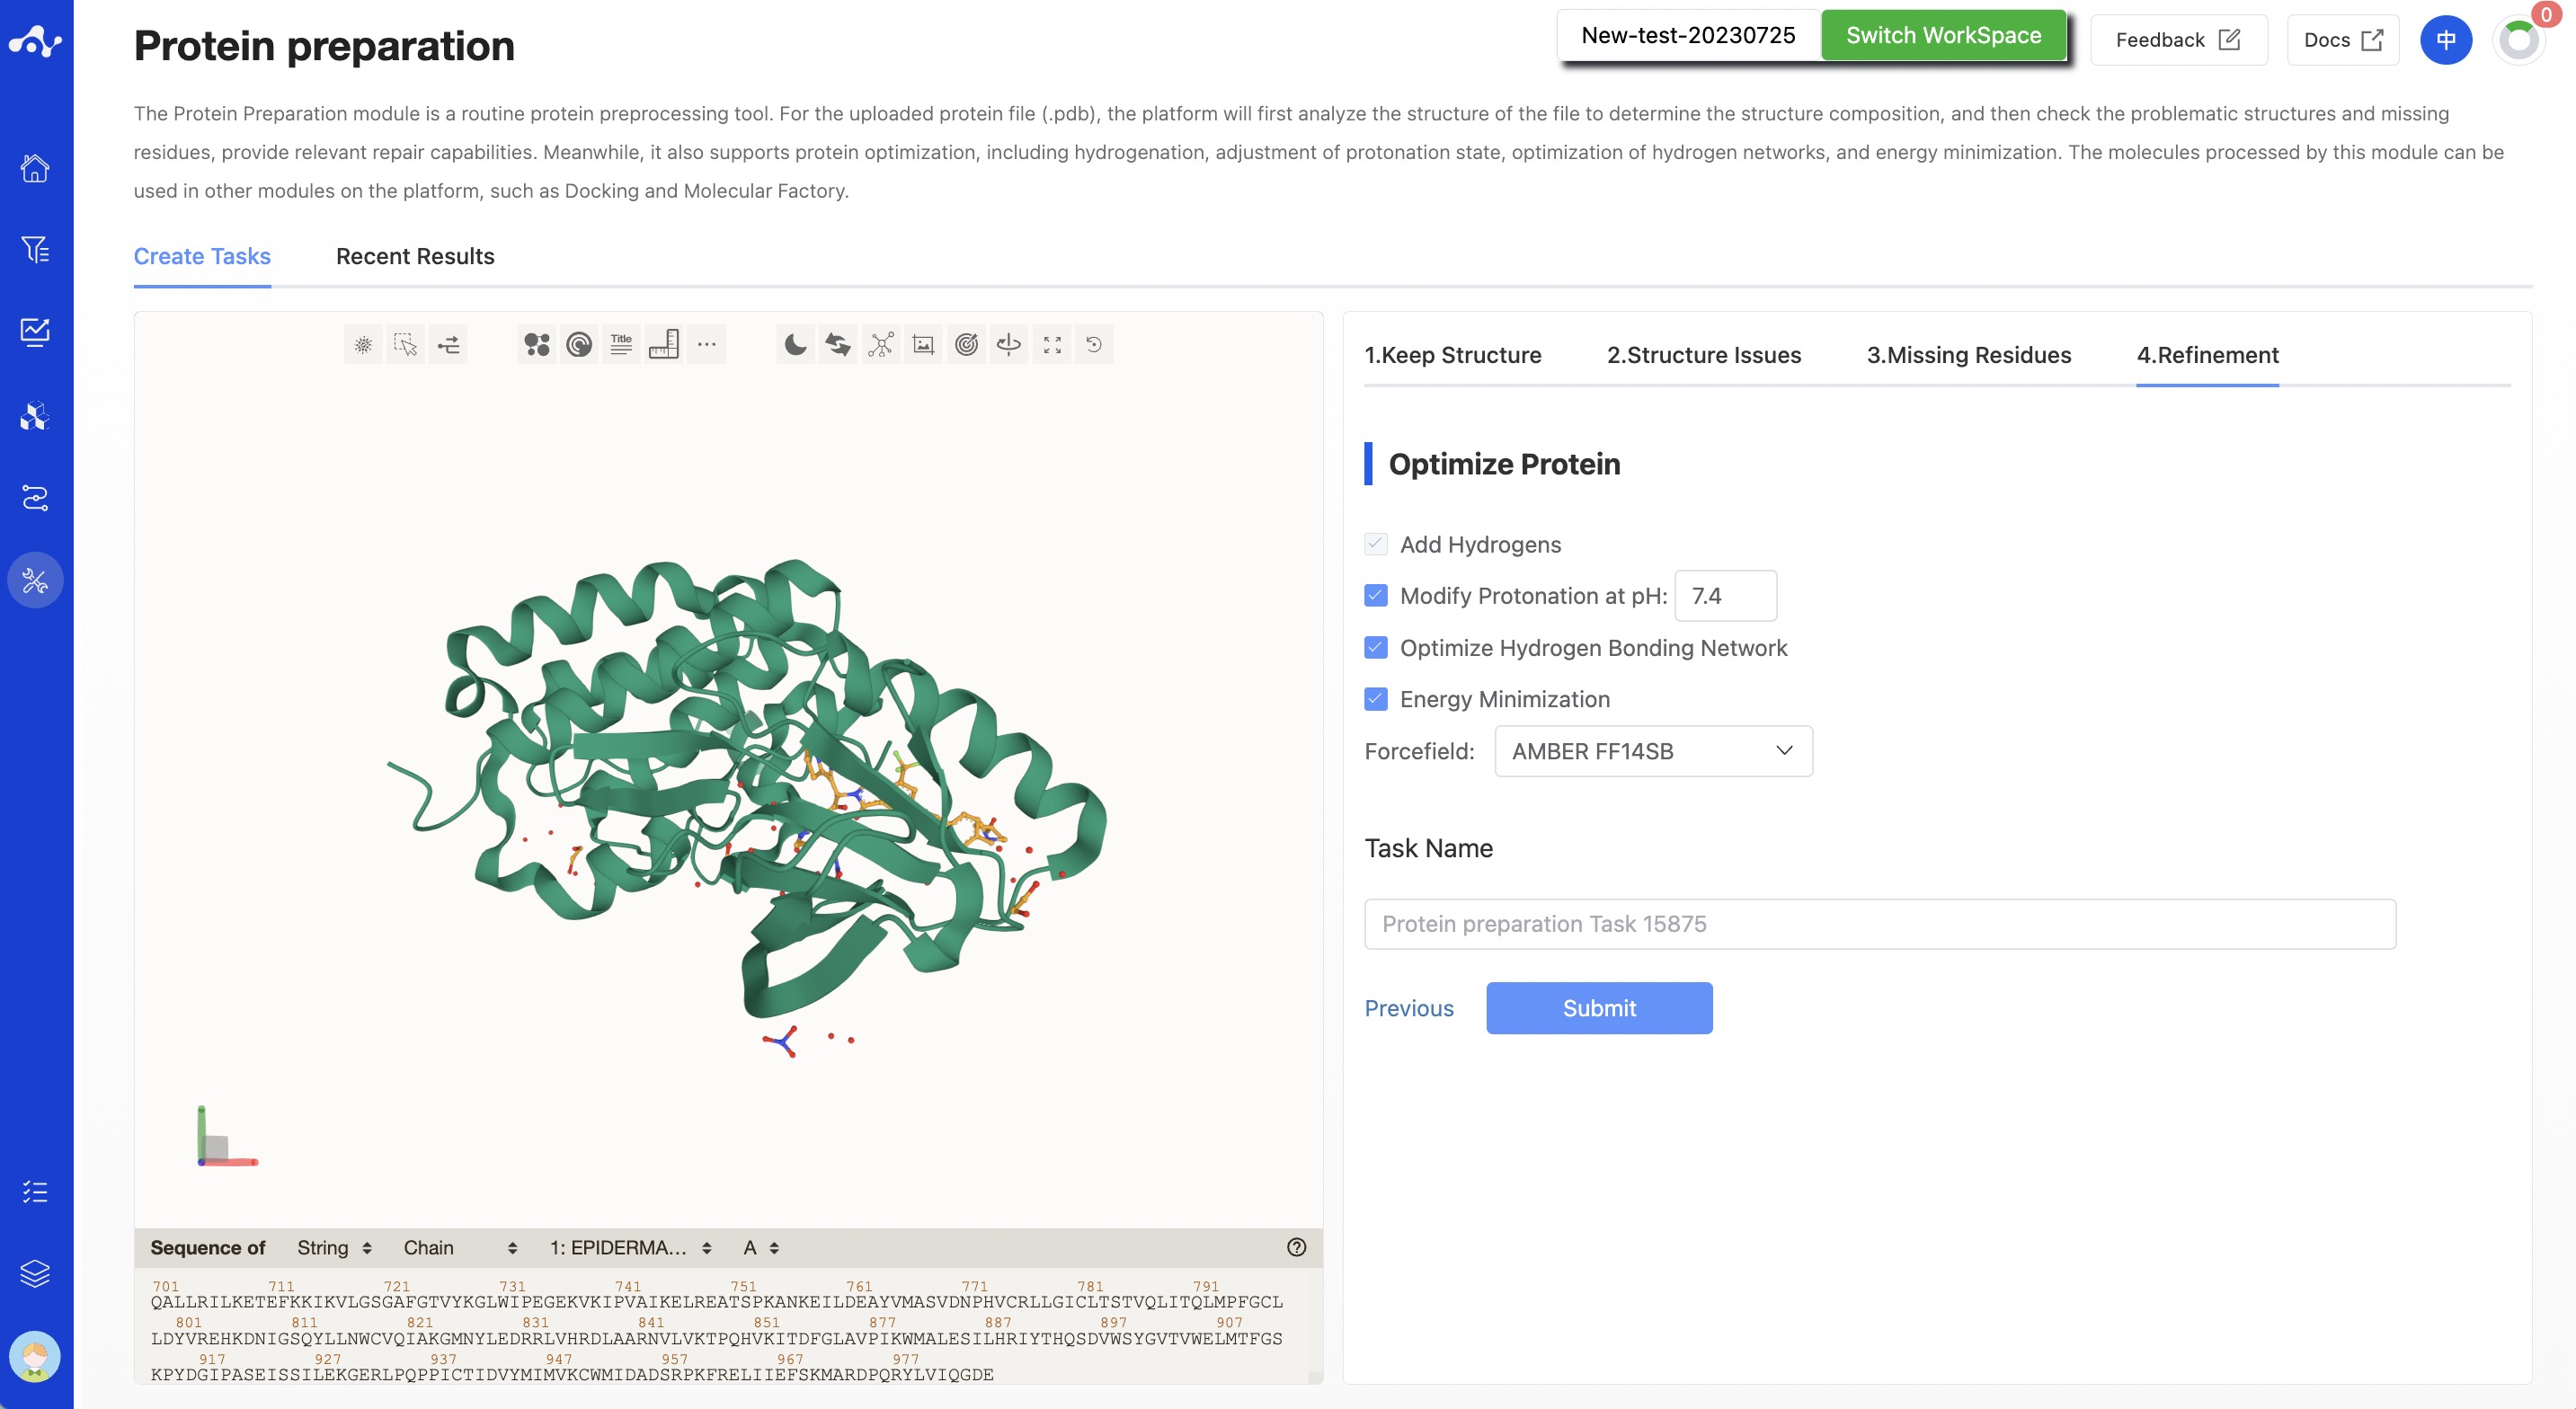
Figure 5. Calculation page for protein preparation - Refinement - Without disulfide bonds
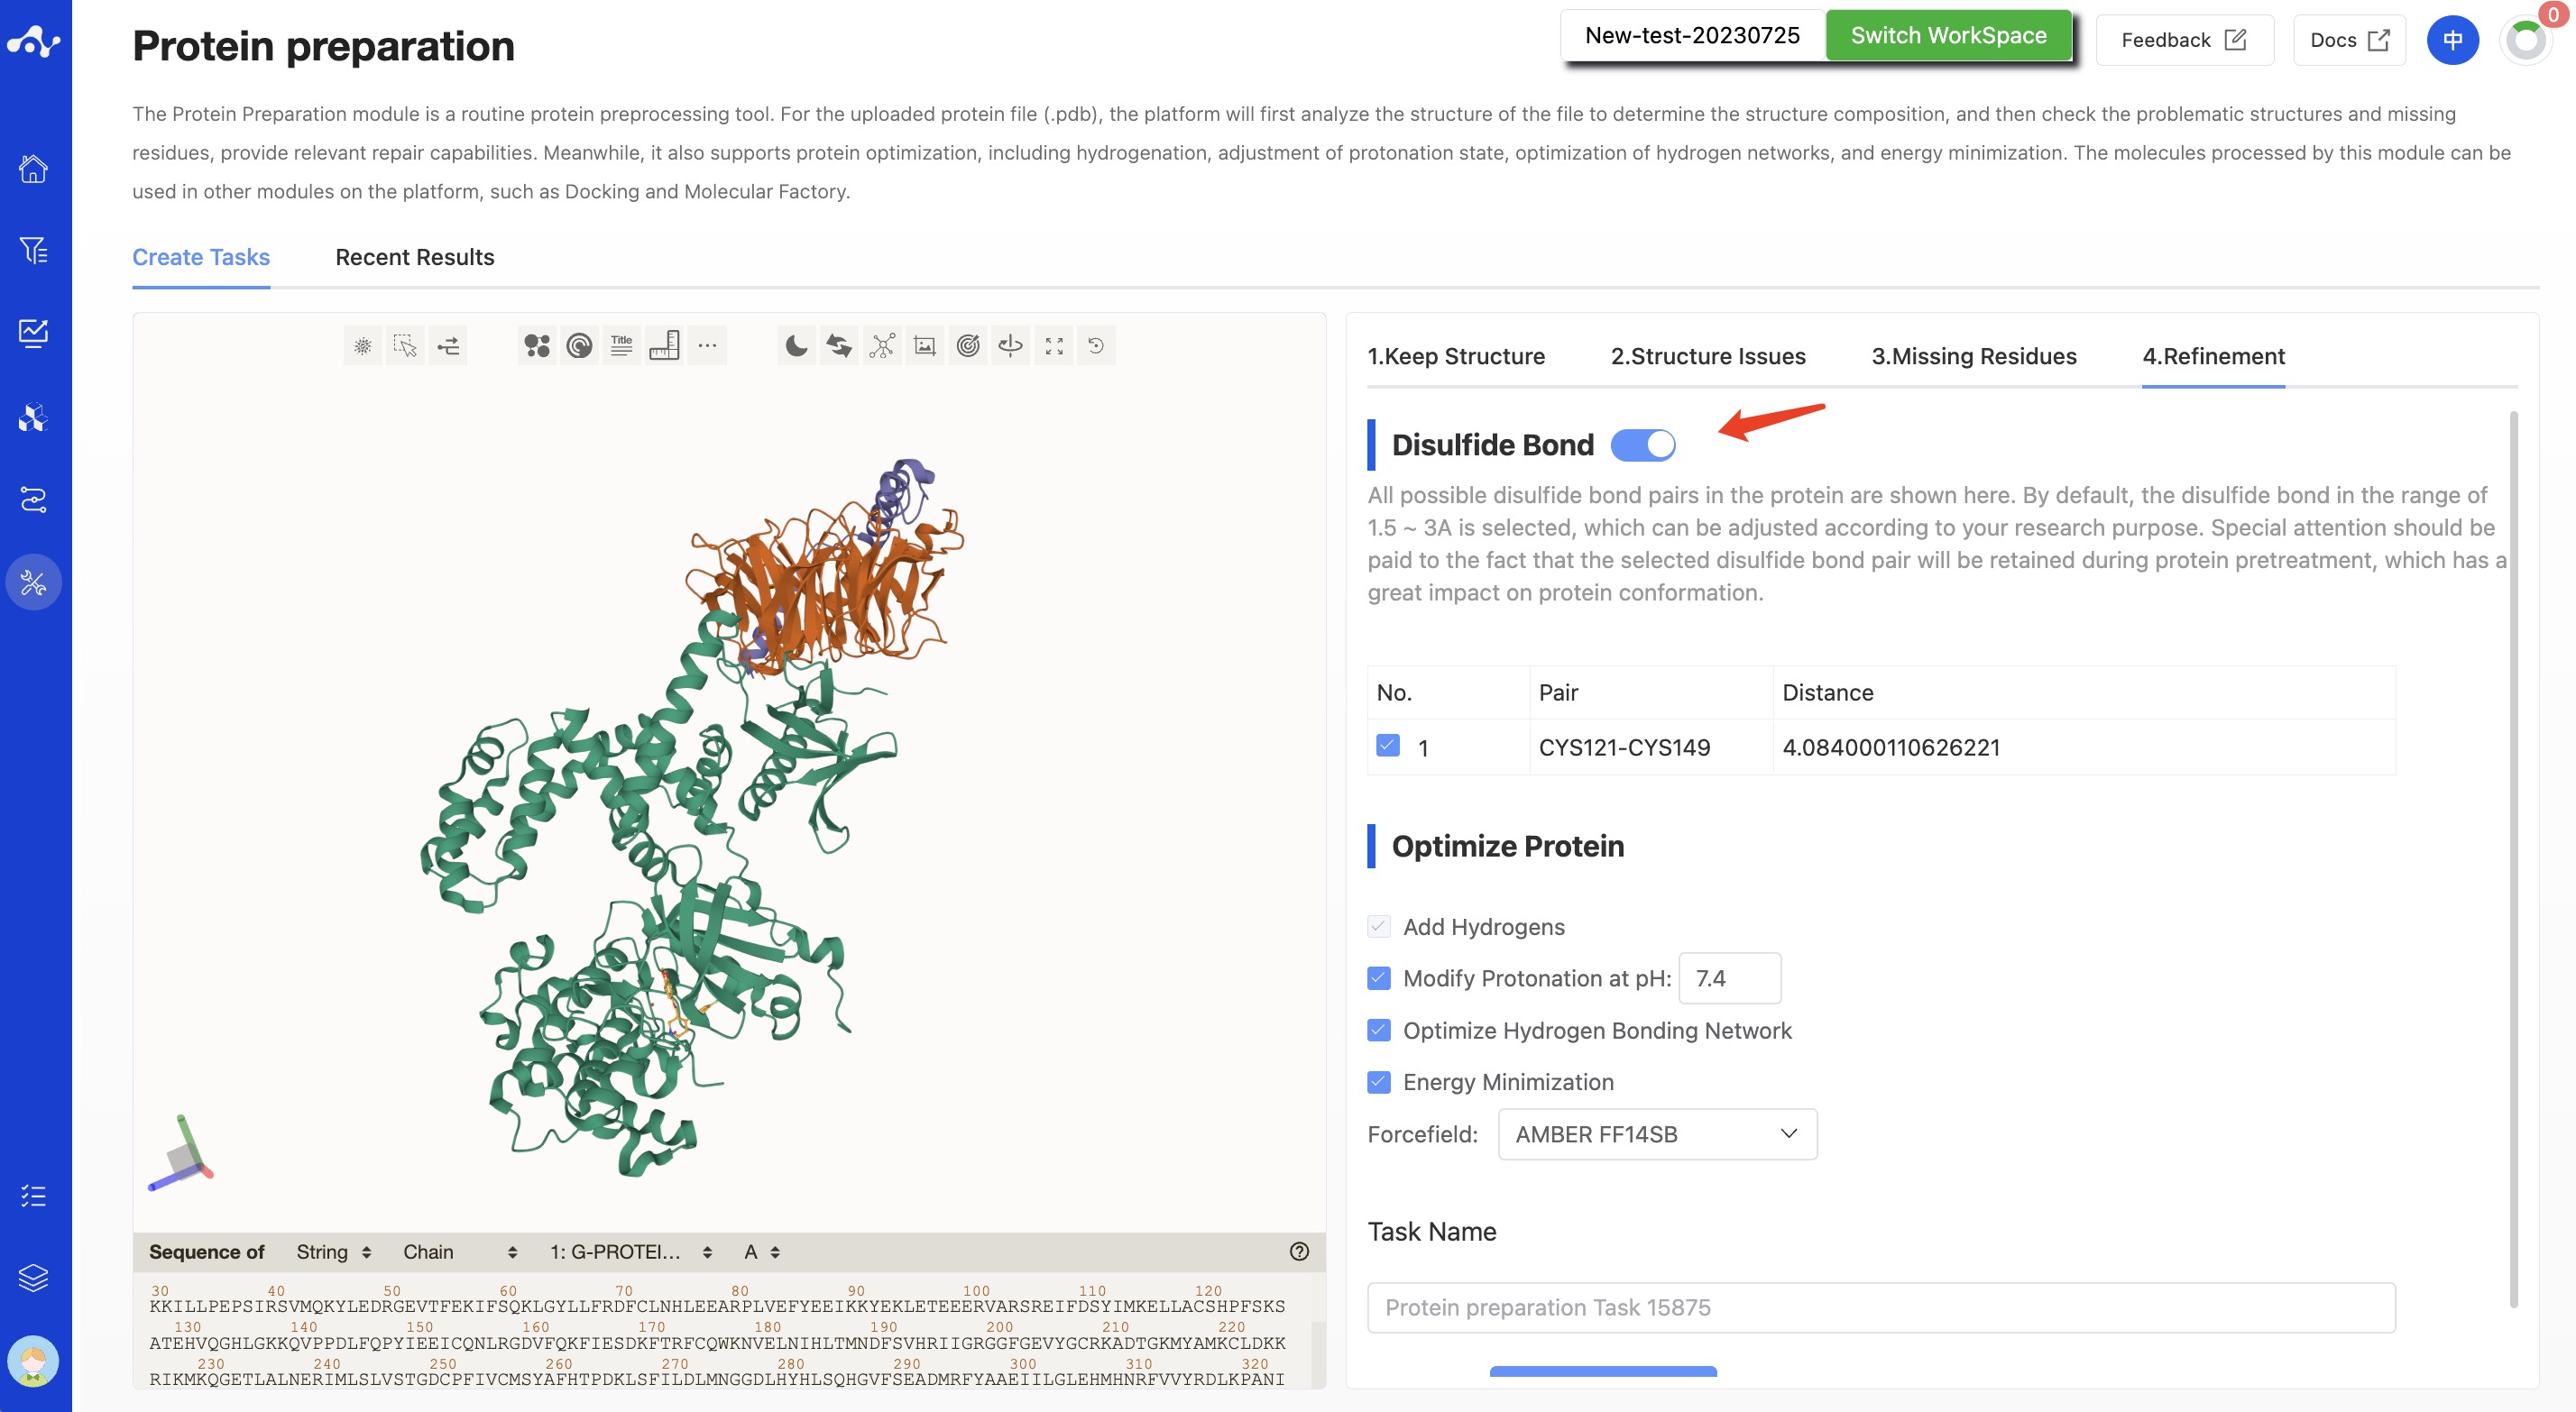
Figure 6. Calculation page for protein preparation - Refinement - With disulfide bonds
(5) Running Sataus and View Results
After submitting the task, the page will automatically jump into the "Recent Results" subpage of the current page. You can view the task running status (progress bar) of the current module on this page, and you can also view all modules that are running tasks in the "Running" drop-down box in the upper right corner.

Figure 7. View Results
3. Results Analysis
The result page of protein preprocessing mainly displays the protein after preprocessing. In addition, we also provide the functions of saving, downloading, and creating new tasks.
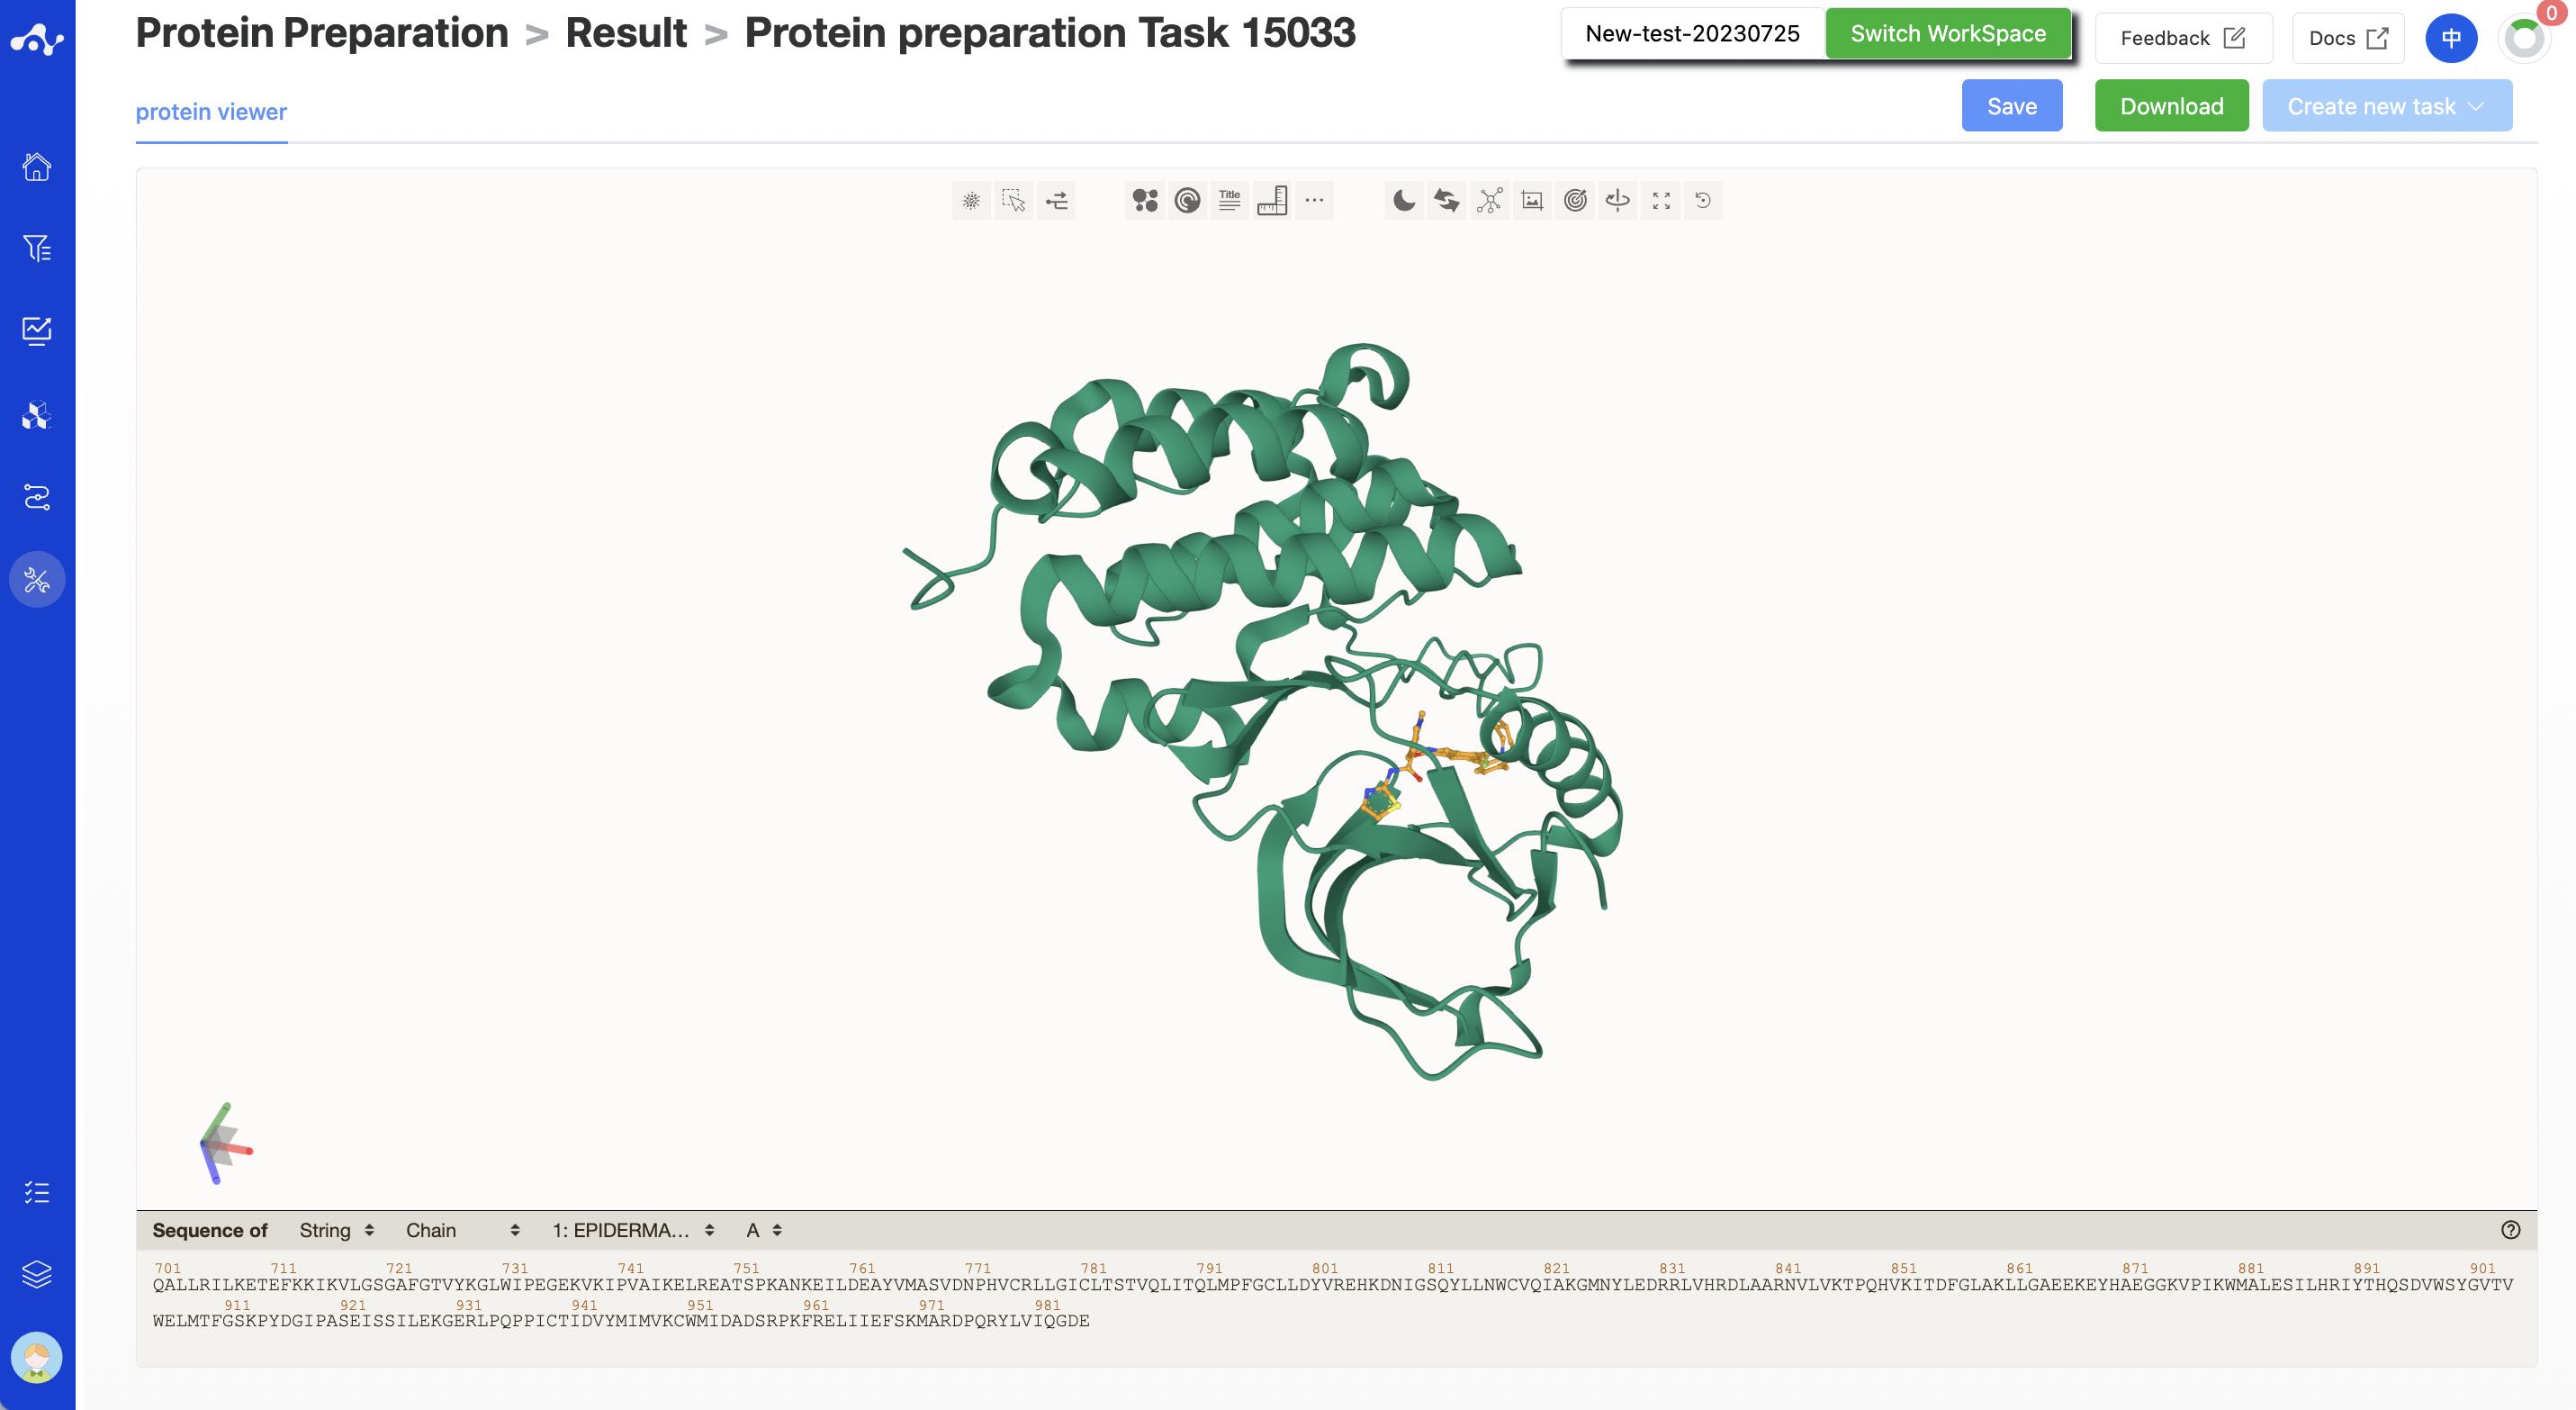
Figure 8. Results Page of protein preparation
(1) Save
Click "Save", and the system will pop up a dropdown box for you to choose the file format to save (currently only supports .csv/.sdf). Once you have determined the style of the file to save, save the corresponding data to the data center as a sdf or csv file. The saved content is the molecules of the effective number displayed on the page, which are usually obtained according to your show/hide column conditions, advanced filtering conditions, favorites, or dislikes.
(2) Download
Click "Download", and the system will pop up a dropdown box for you to choose the file format to download (currently only supports .csv/.sdf). After determining the style of the file to download, the system will download the corresponding data to your local device as a sdf or csv file. The content downloaded is consistent with the save method, which also downloads the molecules of the effective number displayed on the page, which are usually obtained based on your show/hide column conditions, advanced filtering conditions, favorites, or dislikes.
(3) Create New Task
The prerequisite for creating a new task is to first save the data into a file. Before the save operation is performed, this button is disabled. As soon as the new file is saved based on the results, this button is enabled. When you click this button, the system will pop up a dropdown box for you to select the module to be calculated. After clicking, the page will immediately open a new tab and will take your saved dataset with it. After adjusting the parameters, you can submit a new task.
